Proel PLML575SEPS Manuale d'uso
Pagina 30
CARATTERISTICHE TECNICHE
Alimentazione
230V / 50Hz
(117V / 60Hz USA)
Potenza assorbita
800W
Canali DMX
14 / 16 (16 bit)
Connessione DMX
XLR 3 poli
Lunghezza
475 mm
Larghezza
465 mm
Altezza
515 mm
Peso netto
33 kg
Massima temperatura ambiente
40 °C
Massima temperatura dell’apparecchio
90 °C
Distanza minima da superfici infiammabili
1 m
Distanza minima da superfici illuminate
1 m
Fusibile F10A 250V
Nota ogni informazione è soggetta a cambiamenti senza preavviso.
Lampada
HSR / MSR 575
Sistema ottico .
Specchio parabolico ad alta efficienza luminosa e sistema di lenti a doppio condensatore
Multistep zoom (15°, 18°, 22°)
Lenti anti riflessione
Colori
Ruota colori 1: 9 filtri dicroici + bianco, effetto rainbow a velocità regolabile
Ruota colori 2: 6 filtri dicroici, filtri temperatura 3200K, 6000K, UV + bianco
Gobos
Ruota gobo fissi: 9 gobo metalici + bianco, effetto rainbow a velocità regolabile, effetto
shacking – diametro mm.27, fuoco mm.23
Ruota gobo rotanti: 3 gobo metallici + 3 gobo dicroici + bianco, index, effetto rainbow a
velocità regolabile - diametro mm.27, fuoco mm.23
Strobo
Effetto strobo con velocità regolabile fra 1 – 10 flash al secondo
30
If this device will be operated in any way different to the one described in this manual,
the product may suffer damages and the guarantee becomes void. Furthermore, any
other operation may lead to dangers like short-circuit, burns, electric shock, lamp
explosion, crash etc.
INSTALLATION
FITTING / EXCHANGING THE LAMP
DANGER: Install the lamp with the device switched off only. Unplug from mains before.
For the installation you need one HSR575 / MSR575 lamp or equivalent, respecting the
manufacturer’s specifications.
CAUTION: the lamp has to be replaced when it is damaged or deformed due to the heat.
During the operation, the lamp reaches temperatures up to 600°C.
Before replacing the lamp, unplug mains lead and let the lamp cool down (approx.
10 minutes)
During the installation do not touch the glass bulb bare-handed. Please follow the lamp
manufacturer’s notes.
Do not install lamps with a higher wattage. Lamps with a higher wattage generate
temperatures that the device was not designed for. Damages caused by non observance
are not subject to warranty.
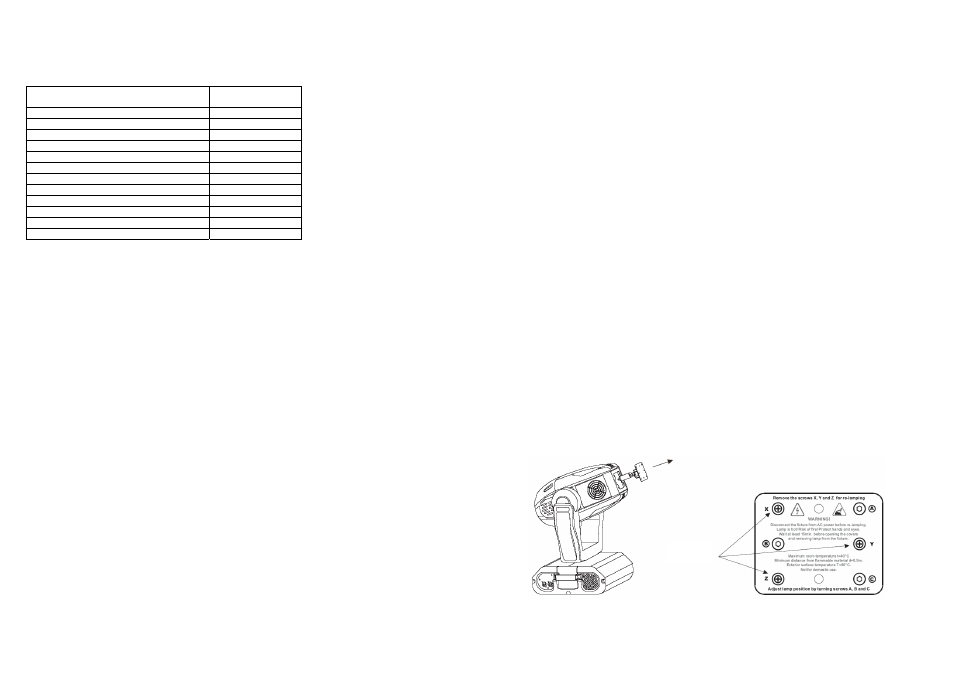
REPLACING THE LAMP
1.
Unscrew the fixation screws (X, Y, Z) of the lamp cover and remove it
2.
If replacing the lamp, remove the hold lamp from the lamp holder
3.
Insert the new lamp into the lamp holder
4.
Replace the lamp cover and tighten the fixation screws (X, Y, Z)
5.
Adjust the lamp as described under lamp adjustment
screws
X, Y, Z
39