Gb for the user, Appliance maintenance – Bompani BO850ED/N Manuale d'uso
Pagina 24
APPLIANCE MAINTENANCE
WARNINGS
Isolate the cooker from the electricity supply before at-
tempting to replace the oven lamp.
The oven lamp
used is of a special type withstanding
high temperatures. To replace it, act as follows: disas-
semble the protecting glass (A) and replace the burnt
lamp with one of the same type. Reassemble the pro-
tecting glass.
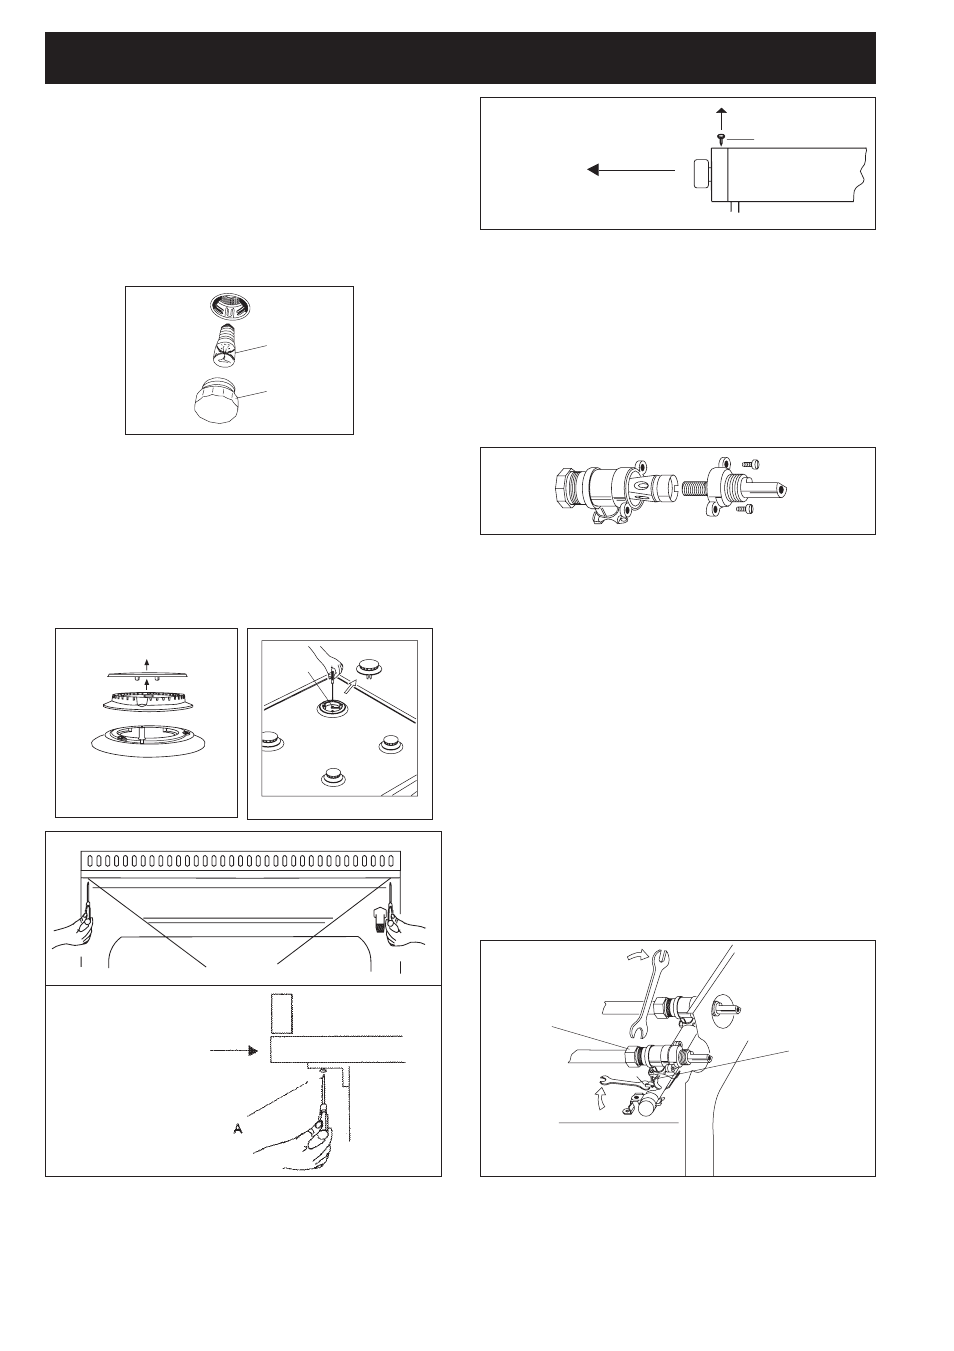
DISASSEMBLE OF WORK-TOP
In case it is necessary to repair or replace the inside
components, act as follows:remove the glass lid from
its position slipping off it upwards. Remove the grids,
remove burners and flame-spreaders (see fig. 13),
unscrew the visible screws “V” placed on the work-top
(see fig. 14). Disassemble the work-top by unscrewing
the 4 rear screws “A” (see fig. 15 ).
- To disassemble the control panel, unscrew the 4
screws (B) fixing the control panel to the oven face (
fig 16 ).
GREASING OF TAPS
WARNING:This operation must be carried out by
skilled staff.
If a tap becomes hard to be turned, grease it using a
specific grease withstanding high temperatures. Act as
follows: switch the appliance off, and close the gas tap
open the work-top and disassemble also the control
panel as described on the previous paragraph. Un-
screw the two fixing screws from the burner body (see
picture) and remove the cone.
Clean the cone and its slot by means of a cloth soaked
with diluent. Slightly grease the cone with the relevant
grease, put it in its slot, and turn it some times. Remo-
ve the cone again, remove the exceeding grease ma-
king sure the gas entries are not obstructed by grease
residuals. Assemble everything carefully in the opposi-
te direction check the connection seal by means of
soapy water.
TAPS REPLACEMENT
Act as follows: switch the appliance off, and close the
general tap open the work-top and disassemble also
the control panel as described on the previous para-
graph. Unscrew screw nut D of the gas tube supplying
the burner. Unscrew screw V fixing the tap to the brid-
le and remove it (see picture).
Note: Every time the tap is replaced, it is necessary to
replace the seal gasket too check the connection seal
by means of soapy water (see picture).
GB
For the user
E 14
25 W - 230 V~
T300¡C
A
B
15
7
D
V
V
Fig. 13
Fig. 16
Fig. 14
A
Fig. 15
To raise the cooking
hob end to push in
ahead
24