Multi-Contact MA207 Manuale d'uso
Pagina 7
Advanced Contact Technology
www.multi-contact.com
7 / 8
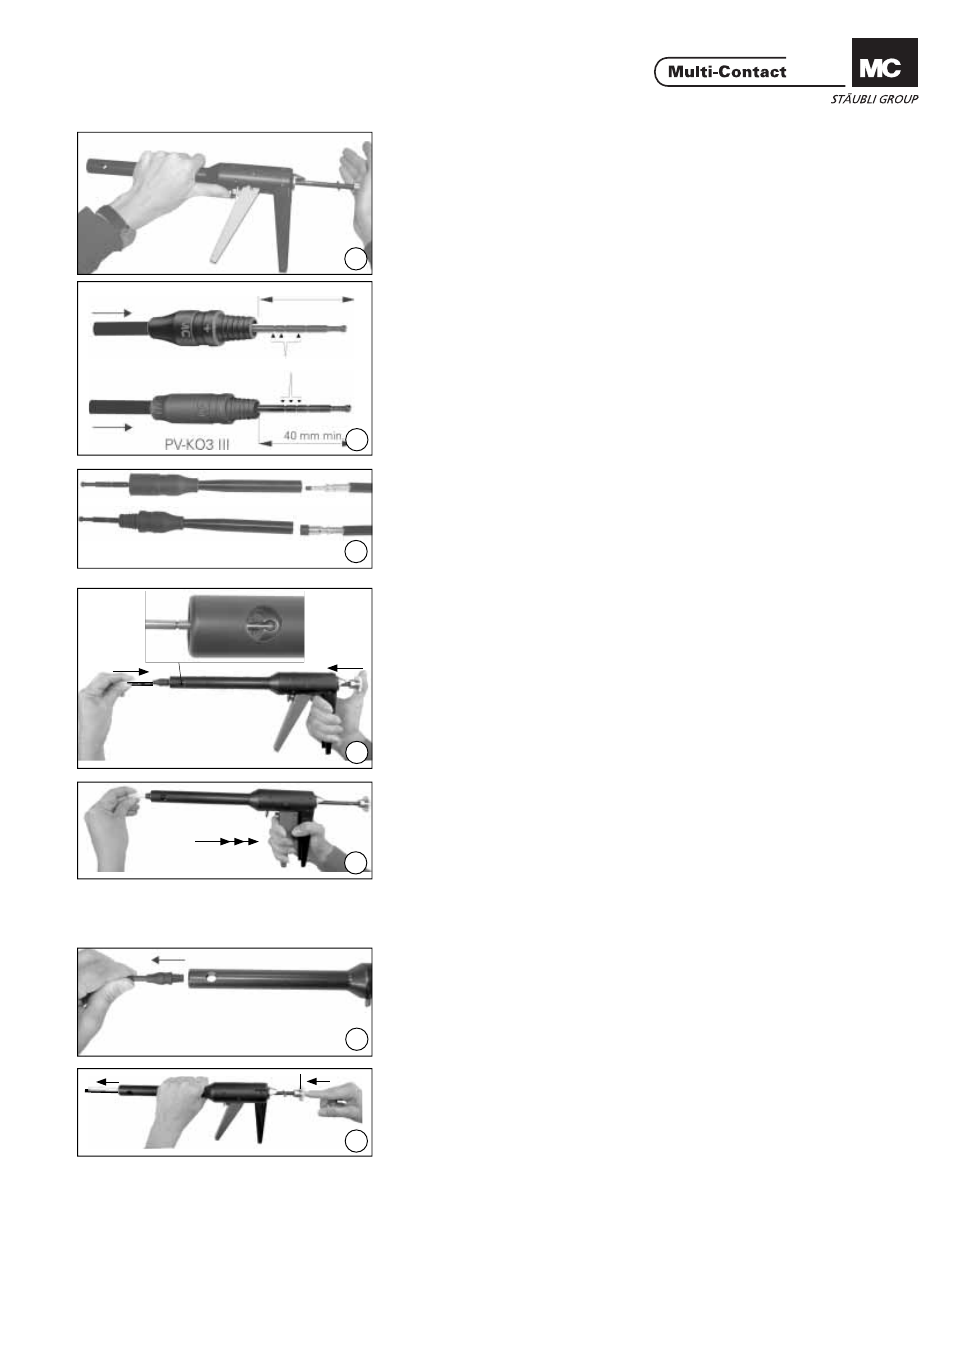
40mm min.
PV-KO3 I+II
14
15
18
19
16
17
13
(ill. 13)
Impugnare l’utensile di montaggio per
il tubo a trazione.
Premere la leva di ritorno R con il
pollice nella direzione della freccia e
contemporaneamente spingere la spi-
na di trazione Z fi no al limite utilizzan-
do l’altra mano.
(ill. 13)
Hold the assembly tool by the pull-in
tube.
Press the return lever R with the
thumb in the direction of the arrow
and at the same time press in the
puller rod Z to the limit with the other
hand.
(ill. 14)
Scegliere il cono:
• PV-KO3 I+II per isolatori a boccola e
spina di dimensione I + II
• PV-KO3 III per isolatori a boccola e
spina di dimensione III
Inserire il cono dal lato posteriore
nell’isolamento fi no a quando la spina
di trazione non sporge di circa 40mm
dall’isolatore a boccola o spina.
(ill. 14)
Select the appropriate tapered spindle:
• PV-KO3 I+II for male and female
coupler insulators of sizes I and II
• PV-KO3 III for male and female cou-
pler insulators of size III
Push the tapered spindle from behind
into the male or female insulator until
the puller rod protrudes from the male
or female insulator by approx. 40mm.
(ill. 15)
Inserire il connettore maschio o fem-
mina con il cavo crimpato nel cono.
(ill. 15)
Insert the male or female coupler
with crimped-on lead into the tapered
spindle.
(ill. 16)
Inserire il cono nell’utensile di mon-
taggio e fi ssarlo poi al supporto del
cono. Durante questa operazione,
tenere ferma in posizione la spina di
trazione.
(ill. 16)
Insert the tapered spindle into the
assembly tool and attach it to the
spindle holder. During this operation
hold the puller rod in position.
(ill. 17)
Agire sul grilletto dell’utensile più vol-
te, tirare il cono all’interno dell’uten-
sile. Esercitare una leggera pressione
per tenere il cavo nel cono, fi nché il
connettore maschio o femmina non è
completamente inserito nell’isolamen-
to del connettore. Estrarre quindi il
connettore assemblato.
(ill. 17)
Actuate the handle of the tool several
times. This pulls the tapered spindle
through the infeed opening of the
tool. Apply gentle pressure to keep
the lead in the spindle until the male
or female coupler part engages in
the insulator. Pull the tapered spindle
completely out of the insulator.
(ill. 18)
Estrarre il connettore maschio o fem-
mina dall’utensile di montaggio.
(ill. 18)
Withdraw the male or female coupler
from the assembly tool.
(ill. 19)
Riportare la spina di trazione Z in posi-
zione iniziale.
Estrarre il cono K dall’utensile di
montaggio.
(ill. 19)
Return the puller rod Z to its starting
position.
Remove the tapered spindle K from
the assembly tool.
Tacche / Grooves