Proel PLHT575S Manuale d'uso
Pagina 6
6
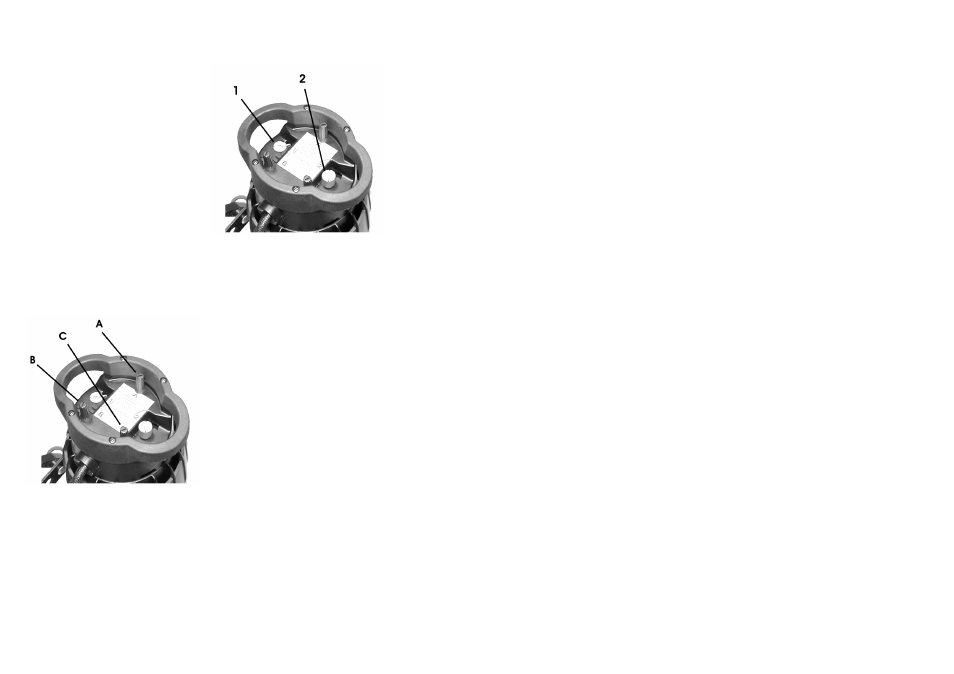
PROCEDIMENTO PER LA SOSTITUZIONE DELLA LAMPADA :
1.
Svitare le viti di fissaggio (1, 2) del
coperchio del portalampada e
rimuoverlo
2.
Se bisogna sostituire la lampada,
rimuovere la vecchia dal
portalampada
3.
Inserire la lampada nuova nel
portalampada
4.
Riposizionare il coperchio del
portalampada e riavvitare le viti di
fissaggio (1, 2)
Non accendere l’apparecchio finché
l’alloggiamento della lampada non sia
chiuso.
REGOLAZIONE DELLA LAMPADA
La lampada viene già centrata in fabbrica. A causa di differenze tra le varie lampade,
una ulteriore regolazione fine potrebbe migliorare la qualità luminosa.
Accendere la lampada, aprire lo shutter e
l’iris, portare l’intensità del dimmer al 100%
e mettere a fuoco l’impronta luminosa su
una superficie piana (es. muro). Centrare
la parte più luminosa del raggio usando le
tre viti di regolazione (A, B, C). Girare una
vite alla volta in modo da veder scorrere il
centro luminoso del raggio lungo la
diagonale dell’impronta luminosa sul muro.
Nel caso non si riesca a distinguere la
parte più luminosa del raggio, regolare la
lampada, fin quando l’impronta luminosa
non sia uniforme.
Per ridurre l’intensità del centro luminoso,
tirare la lampada girando le tre viti (A, B,
C) in senso orario ¼ di giro alla volta fino a
quando la luce non sia uniformemente
distribuita.
Se l’impronta è più luminosa intorno al bordo rispetto al centro, o la luminosità è bassa,
la lampada è troppo distante dal fondo della parabola. Spingere la lampada girando le
tre viti (A, B, C) in senso antiorario ¼ di giro alla volta fino a quando la luminosità sia
maggiore ed uniformemente distribuita.
11
Never let the power-cord come into contact with other cables! Handle the power-cord
and all connections with the mains with particular caution!
Make sure that the available voltage is not higher than stated on the rear panel.
Make sure that the power-cord is never crimped or damaged by sharp edges. Check the
device and the power-cord from time to time.
Always disconnect from the mains, when the device is not in use or before cleaning it.
Only handle the power-cord by the plug. Never pull out the plug by tugging the power-
cord.
During the initial start-up some smoke or smell may arise. This is a normal process and
does not necessarily mean that the device is defective.
CAUTION: During the operation, the housing becomes very hot.
Do not switch the device on and off in short intervals as this would reduce the lamp’s life.
HEALTH HAZARD: Never look directly into the light source.
Keep away children and amateurs.
OPERATING DETERMINATIONS
This device is spot for professional use on stages, in discotheques, theatres etc. This
fixture is only allowed to be operated with an alternating current of max. 230V, 50-60Hz
(117V – 60Hz – US model for USA) and was designed for indoor use only.
Lighting effects are not designed for permanent operation. Consistent operation breaks
will ensure that the device will serve you for a long time without defects.
Do not shake the device. Avoid brute force when installing or operating the device.
Never lift the fixture by holding it at the projector-head, as the mechanics may be
damaged. Always hold the fixture at the transport handles.
When choosing the installation-spot, please make sure that the device is not exposed to
extreme heat, moisture or dust. There should not be any cables lying around. You
endanger your own and the safety of others.
The minimum distance between light-output and the illuminated surface must be more
than 2 meters.
Make sure that the area below the installation place is blocked when rigging, derigging or
servicing the fixture.
Always fix the fixture with an appropriate safety-rope.